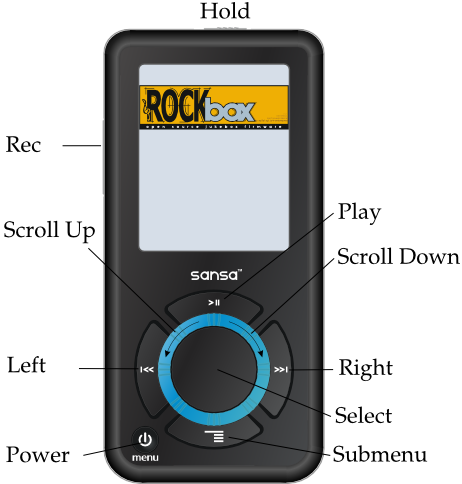

This manual refers to the buttons using the names shown in the picture. When a button name is preceded by “Long” it means that you should press it for approximately 1 second.
Additional information is available for blind users on the Rockbox website at http://www.rockbox.org/twiki/bin/view/Main/BlindFAQ.
Hold the player with the turning wheel at the front and bottom. On the bottom left of the front of the player is a raised round button, the Power button. Above and to the left of this, on the outside of the turning wheel are four buttons. These are the Play, Submenu, Left and Right buttons. Inside the wheel is thr Select button. Turning the wheel to the right activates the Scroll Down function, and to the left, the Scroll Up function.
On the right of the unit is a slot for inserting flash cards. On the bottom is the connector for the USB cable. On the left is the Rec button, and on the top, there is the headphone socket to the right, and the Hold switch. Moving this switch to the right activates hold mode in which none of the other buttons have any effect. Just to the left of the Hold switch is a small hole which contains the internal microphone.
To turn on and off your Rockbox enabled player use the following keys:
| Key | Action |
| Power | Start Rockbox |
| Hold Power | Shutdown Rockbox |
On shutdown, Rockbox automatically saves its settings.
Rockbox has a dual-boot feature. To boot into the original firmware, press and hold the Left button while turning on the player.
Rockbox plays many file formats, for a list of formats supported by Rockbox on your Sansa see REF ((I can’t find this info anywhere, the wiki has a table, but it just says rockbox can do them all)). You can put the files anywhere you like and Rockbox will find them.
Note: To copy music to your Sansa you have to boot the manufacturer’s firmware as described in section 3.1.3. The Sansa firmware always sets the /MUSIC folder to hidden. To see this folder you have to change the Show Files setting to all (section 7.3).
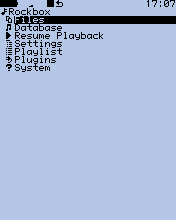
The first screen shown is the Main Menu. Move through the items on the menu using Scroll Down and Scroll Up. Then use Select or Right to select an item. The simplest way to play a file is to open the File Browser by selecting Files in the Main Menu, then use Select or Right to enter a folder (Left goes back to the previous folder or menu). Finally, use Select or Right to play a music file.
Once you have selected a file for playing the view switches to the “While playing screen” (“WPS”) showing information about the file and your player. Use Scroll Up / Scroll Down to adjust the volume and Play to toggle pause. To go back to the File Browser use Long Select (Long Play does the same but also stops playback). Return to the WPS using Play or by selecting Now Playing from the Main Menu.
If Rockbox’s default WPS is not to your taste, you can change it easily. Use Power to get back to the Main Menu and then select Settings then Browse Themes. Select a theme and then use Play to return to the WPS. There are many more themes on the Internet.
Note: Some of the themes shipped with Rockbox need additional fonts from the fonts package, so make sure you installed them.
After the file you first selected has finished playing, Rockbox will start playing the next file in the folder. This happens because when you select a file to play using the File Browser, Rockbox creates a playlist containing all the files in the folder (called a dynamic playlist). To see the current playlist go to the Main Menu and then select Playlists then View Current Playlist. The playlist can be edited from here. For instance, to remove a song move down to it and then use Submenu to access the Context Menu and then select Remove.
Note: A context menu is a menu containing actions that relate to the highlighted item. So, for an item in a playlist the Context Menu has Remove, Move etc., whereas for a file the Context Menu has Rename, Cut, Paste, Delete etc.
Note: The WPS also has a context menu (also accessed with Submenu) which contains shortcuts to frequently used functions, such as Sound Settings (Bass, Treble, EQ etc.) and Playlist functions.
You can add songs to the Current Playlist in many ways. For instance, to add all the files in a folder you can highlight the folder in the File Browser, use Submenu to access the Context Menu then Playlist and Insert last. If you do this while the the player is playing, the files will be added onto the end of the dynamic playlist. However, if the player is stopped, the new files will replace the dynamic playlist. The current playlist can also be saved and loaded again later see section 4.4.5.
Although you can select music using only the File Browser, you can also browse by categories such as Artist, Album and Title. To access the categories select Database from the Main Menu. The first time you do this Rockbox will scan your disk for audio files (which can take some time). After the scan is finished you may be prompted to restart your player before you can use the database (see section 4.2).
Rockbox has many other features, a few are:
Which lowers the volume and sets the LCD for comfortable night viewing. See section 10.3 for more on using .cfg files.
include an overview of the menu structure here