Figure 4.1: The file browser
Rockbox lets you browse your music in either of two ways. The File Browser lets you navigate through the files and folders on your player, entering folders and executing the default action on each file. To help differentiate files, each file format is displayed with an icon.
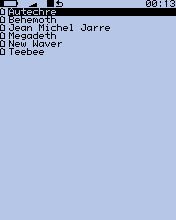
The Database Browser, on the other hand, allows you to navigate through the music on your player using categories like album, artist, genre, etc.
You can select whether to browse using the File Browser or the Database Browser by selecting either Files or Database in the Main Menu. If you choose the File Browser, the Show Files setting lets you select what types of files you wish to view. See section 7.3 for more information on the Show Files setting.
Note: The File Browser allows you to manipulate your files in ways that are not available within the Database Browser. Read more about Database in section 4.2. The remainder of this section deals with the File Browser.
| Key | Action |
| Scroll Up/Scroll Down | Go to previous/next item in list. If you are on the first/last entry, the cursor will wrap to the last/first entry. |
| Left | Go to the parent directory. |
| Select | Executes the default action on the selected file or enters a directory. |
| Play | If there is an audio file playing, returns to the While Playing Screen (WPS) without stopping playback. |
| Long Play | Stops audio playback. |
| Submenu | Enter the File Menu |
| Power | Enter the Main Menu |
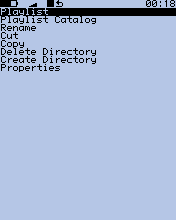
The File Menu allows you to perform certain operations on files or folders. To access the File Menu, position the selector over a file or folder and access the context menu with Submenu.
Note: The File Menu is a context sensitive menu. If the File Menu is invoked on a file, it will display options available for files. If the File Menu is invoked on a folder or directory, it will display options for directories.
The File Menu contains the following options (unless otherwise noted, each option pertains both to files and directories):
This is the virtual keyboard that is used when entering text in Rockbox, for example when renaming a file or creating a new directory.
| Key | Action |
| Left/ Right/ Scroll Up/ Scroll Down | Move about the virtual keyboard (moves the solid cursor) |
| Rec + Left or Rec + Right | Move the line cursor within the text line |
| Select | Inserts the selected keyboard letter at the current cursor position |
| Power | Exits the virtual keyboard without saving any changes |
| Play | Exits the virtual keyboard and saves any changes |
| Submenu | Deletes the character before the line cursor |
This chapter describes the Rockbox music database system. Using the information contained in the tags (ID3v1, ID3v2, Vorbis Comments, Apev2, etc.) in your audio files, Rockbox builds and maintains a database of the music files on your player and allows you to browse them by Artist, Album and Genre.
The first time you use the database, Rockbox will scan your disk for audio files. This can take quite a while depending on the number of files on your player. This scan happens in the background, so you can choose to return to the Main Menu and continue to listen to music. If you shut down your player, the scan will continue next time you turn it on. After the scan is finished you may be prompted to restart your player before you can use the database.
Note: If you browse your music frequently using the database, you should load to RAM, as this will reduce the overall battery consumption because the disk will not need to spin on each search.
Note: The Auto Update will only check for deleted files if the Directory Cache (Settings → General Settings → System → Disk → Directory Cache) is enabled. Update now includes that check whether dircache has been enabled or not.
Warning: Initialize Now removes all database files (removing runtimedb data also) and rebuilds the database from scratch.
Note: Unlike the Auto Update function, Update Now will update the database regardless of whether the Directory Cache is enabled. Thus, an update using Update now may take a long time.
Unlike Initialize Now, the Update Now function does not remove runtime database information.
Once the database has been initialized, you can browse your music by Artist, Album, Genre
and Song Name. To use the database, go to the Main Menu and select Database.
Note: You may need to increase the value of the Max files in dir browser setting
(Settings → General Settings → System → Limits) in order to view long lists of tracks
in the ID3 database browser.
There is no option to turn off database completely. If you do not want to use it just don’t do the initial build of the database and do not load it to RAM.
| Supported Tags | Unsupported Tags |
| Artist | Comment |
| Album | Performer |
| Bitrate | |
| Composer | |
| Genre | |
| Length | |
| Title | |
| Track Number | |
The While Playing Screen (WPS) displays various pieces of information about the currently playing audio file. The appearance of the WPS can be configured using WPS configuration files. The items shown depend on your configuration – all item can be turned on or off independently. Refer to section B for details on how to change the display of the WPS.
See section 10.2 for details of customising your WPS (While Playing Screen).
| Key | Action |
| Scroll Up / Scroll Down | Volume up/down. |
| Left | Go to beginning of track, or if pressed while in the first seconds of a track, go to previous track. |
| Long Left | Rewind in track. |
| Right | Go to next track. |
| Long Right | Fast forward in track. |
| Play | Toggle play/pause. |
| Long Play | Stop playback. |
| Long Select | Return to the File Browser. |
| Submenu | Enter WPS Context Menu. |
| Power | Enter Main Menu. |
| Long Submenu | Enter Quick Screen. |
| Power + Right | Skip to the next directory. |
| Power + Left | Skip to the previous directory. |
The peak meter can be displayed on the While Playing Screen and consists of several indicators. For a picture of the peak meter, please see the While Recording Screen in section 5.8.1.
Note: Note that the clip detection is not very precise. Clipping might occur without being indicated.
Like the context menu for the File Browser, the WPS Context Menu allows you quick access to some often used functions:
This is a shortcut to the Sound Settings Menu, where you can configure volume, bass, treble, and other settings affecting the sound of your music. See section 6 for more information.
The Playlist submenu allows you to view, save, search and reshuffle the current playlist. To change settings for the Playlist Viewer press Power while viewing the playlist to bring up the Playlist Viewer Menu.
The menu entry is only shown if Gather Runtime Information is enabled. It allows the asignment of a personal rating value (0 – 10) to a track which can be displayed in the WPS and used in the Database browser. Press Right to increment the value. The value wraps at 10.
This allows you to create a bookmark in the currently-playing track.
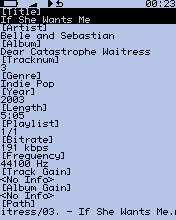
This screen is accessible from the WPS screen, and provides a detailed view of all the identity information about the current track. This info is known as meta data and is stored in audio file formats to keep information on artist, album etc. To access this screen,
This Open With function is the same as the Open With function in the File Context Menu.
The Pitch Screen allows you to change the pitch and (at the same time) the playback speed of your player. The pitch value can be adjusted between 50% and 200%. 50% means half the normal playback speed and the pitch that’s an octave lower than the normal pitch. 200% means double playback speed and the pitch that’s an octave higher than the normal pitch. It’s not possible to change the pitch without changing the playback speed and vice versa. Changing the pitch can be done in two modes: procentual and semitone. Initially (after the player is switched on), procentual mode is active.
| Key | Action |
| Rec | Toggle pitch changing mode |
| Play / Submenu | Increase / Decrease pitch by 0.1% (in procentual mode) or a semitone (in semitone mode) |
| Long Play / Long Submenu | Increase / Decrease pitch by 1% (only in procentual mode) |
| Right / Left | Temporarily increase / decrease pitch by 2.0% |
| Select | Reset pitch to 100% |
| Power | Leave the Pitch Screen |
This is a shortcut to the Equalizer. See section 6.8.
Browse presets for the Equalizer.
This section is currently in a half written state, with possible errors and a lot of stuff missing. Please help us fix this chapter by submitting additions/corrections to the tracker
Some common terms that are used in Rockbox when referring to playlists:
Rockbox can create playlists in four different ways.
Whenever a song is selected from the File Browser with Select, Rockbox will automatically create a playlist containing all of the songs in that directory and start playback with the selected song.
Note: If you already have created a dynamic playlist, playing a new song will erase the current dynamic playlist and create a new one. If you want to add a song to the current playlist rather than erasing the current playlist, see the section below on how to add music to a playlist.
If playback is stopped, the Insert and Queue functions can be used as described in 4.4.3 to create a new playlist instead of adding to an existing one. This will erase any dynamic playlist.
The Playlist catalog makes it possible to modify and create playlists that are not currently playing. To do this select Playlist catalog in the File Menu. There you will have two choices, Add to playlist adds the selected track or directory to an existing playlist and Add to a new playlist creates a new playlist containing the selected track or directory.
Note: All playlists in the Playlist catalog are stored in the /Playlists directory in the root of your player’s harddisk and playlists stored in other locations are not included in the catalog. It is however possible to move existing playlists there (see section 4.1.2).
To create a playlist containing all music on your player, you can use the Create Playlist command in the Playlist Options menu found in the Main Menu. The created playlist will be named root.m3u and saved in the root of your player’s harddisk.
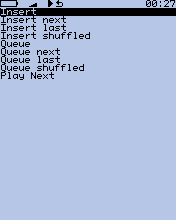
The Playlist Submenu is a submenu in the File Menu (see section 4.1.2), it allows you to put tracks into a “dynamic playlist”. If there is no music currently playing, Rockbox will create a new dynamic playlist and put the selected track(s) into it. If there is music currently playing, Rockbox will put the selected track(s) into the current playlist. The place in which the newly selected tracks are added to the playlist is determined by the following options:
The Playlist Submenu can be used to add either single tracks or entire directories to a playlist. If the Playlist Submenu is invoked on a single track, it will put only that track into the playlist. On the other hand, if the Playlist Submenu is invoked on a directory, Rockbox adds all of the tracks in that directory to the playlist.
Note: You can control whether or not Rockbox includes the contents of sub-directories when adding an entire directory to a playlists. Set the Settings → General Settings → Playlist → Recursively Insert Directories setting to Yes if you would like Rockbox to include tracks in sub-directories as well as tracks in the currently-selected directory.
Dynamic playlists are saved so resume will restore them exactly as they were before shutdown.
Note: To view, save or reshuffle the current dynamic playlist use the Playlist sub menu in the WPS context menu or in the Main Menu.
Reshuffeling the current playlist is easily done from the Playlist sub menu in the WPS, just select Reshuffle.
To move or remove a track from the current playlist enter the Playlist Viewer by selecting View Current Playlist in the Playlist submenu in the WPS context menu or the Main Menu. Once in the Playlist Viewer open the context menu on the track you want to move or remove. If you want to move the track, select Move in the context menu and then move the blinking cursor to the place where you want the track to be moved and confirm with Select or Right. To remove a track, simply select Remove in the context menu.
To save the current playlist either enter the Playlist submenu in the WPS Context Menu (see section 4.3.3) and select Save Current Playlist or enter the Playlist Options menu in the Main Menu and select Save Current Playlist. Either method will bring you to the Virtual Keyboard (see section 4.1.3), enter a filename for your playlist and accept it and you’re done.
Playlist files, like regular music tracks, can be selected through the File Browser. When loading a playlist from disk it will replace the current dynamic playlist.
The Playlist catalog offers a shortcut to all playlists in your player’s harddisk root folder called /Playlists. It can be used like the File Browser.
You can control whether or not Rockbox includes the contents of sub-directories when adding an entire directory to a playlists. Set the Main Menu → Settings → Playlist → Recursively Insert Directories setting to Yes if you would like to include tracks in sub-directories as well as tracks in the currently selected directory.